So, you want to start your email list? Becoming an
Email Marketing Pro starts by choosing the right email service provider. I recommend Mailchimp for its ease of use, low cost, and special features. Even if you are starting at zero for your email list, these
Mailchimp tips for beginners will have you excited to write and design your emails!
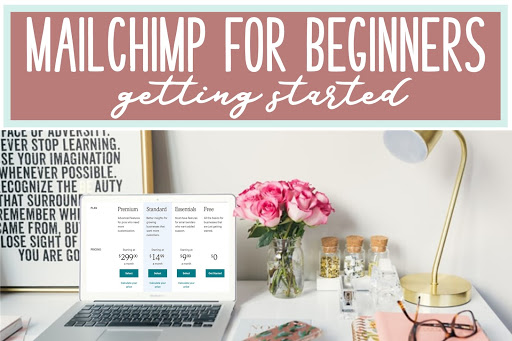
Choose a plan
When you go to Mailchimp’s website, you’ll want to check out the various plans. There are four different levels of plans available ranging from free to $299.99 a month. For beginners, you’ll just want to look at the first three options.
Free Plan
The free Mailchimp plan allows you to have up to 2000 contacts on your list. The main features include the following:
7 marketing channels
1-click automations (to send to your list)
Basic templates for your newsletter
Behavioral targeting (actions and automations based on contacts’ clicks and opens)
Custom domains (free Mailchimp domains or buy/connect an existing domain)
Websites (beta, ability to build website from Mailchimp)
Essentials Plan
If you’re serious about growing your email list, you may find yourself upgrading to the standard plan for $9.99 a month. With this plan, you’ll receive everything that the free plan offers plus the following:
All email templates
A/B testing (which allows you to customize messages/automations based on client actions)
Custom branding
24/7 award-winning customer support
Standard Plan
For just $5 a month more than the Essentials plan, the Standard plan adds a few additional features:
Advanced audience insights
Retargeting ads
Custom templates (to suit your brand)
Event-based automation series
You don’t have to spend the big bucks to become an
Email Marketing Pro. In fact, it’s completely fine to start with the free plan and upgrade based on your needs!
The additional
mailchimp tips for beginners are based on the free plan, so if you want to enroll today to try them out, go for it!
Build Your Contact List

If you don’t have a large contact list, don’t worry! There are so many ways to start building your audience and getting those email addresses!
Add a freebie opt-in to your blog or website in exchange for their name and email.
Collect emails for a newsletter sign up from your blog.
If you have a Facebook group, ask for an email as part of the membership questions. (Just make sure you disclose that they are opting in for future emails.)
Importing Contacts
Once you sign up for Mailchimp, you may already have some contacts you want to start emailing. Do not add people randomly. That is against the law. However, if you’ve had a previous opt-in list you’ve collected, you’ll want to import your contact list.
The easiest way to import contacts is to use a spreadsheet on Google Docs or Microsoft Excel. Create a spreadsheet with three columns: email address, first name, and last name. Paste your contacts’ information into the spreadsheet, and then download or export as a .CSV.
After downloading the file, you can upload the spreadsheet into the Audience tab on Mailchimp. Mailchimp makes this so easy with their online step-by-step walk through! https://mailchimp.com/help/import-contacts-mailchimp/ You can even segment your audience, so if you have multiple products you’re promoting, you can make sure you’re always reaching the right target group!
Create an Email Campaign
Now that you have some people on a list, it’s time to start emailing! Start by creating an email campaign.
Template Design
First, choose an email template. Mailchimp has plenty of basic templates in the free plan to get you started!
Choose a template that suits your brand. It doesn’t need to be anything fancy. Just make sure your readers can navigate and understand that it’s you.
Add Content
Next, add your content. Make sure whatever content you add is also focused on your brand. Be consistent. When you show up in your reader’s inbox, you want to make sure they recognize you every time and keep clicking!
At the top, include a header or a picture that reminds your reader of your site or products. Sign your emails the same way each time you send one out. For example, you may say, “Always Learning, Mrs. B.” Whatever you use as a signature, make sure it fits your niche and brand.
Consider including a call to action at the end of your email. When you’re first starting out, it’s great to ask your readers to respond to questions or give suggestions. That gets you in their inbox, through their spam filters, and gives you much needed feedback as you build your list and brand!
Choose Your Audience
Mailchimp makes it easy for you to choose which segment or your audience gets your email. When you are first starting out, you may not tag or segment your audience. You may choose to email everyone on your list, and that’s fine. Once you start to determine your reader’s patterns and what they are interested in, segmenting is the next step!
Send the Email
Your email will always go out with compliant information at the end (giving users a chance to unsubscribe). There’s nothing for you to worry about there! Just make sure to check back on your open and click through stats to see how your content is working!
Mailchimp is just a tool to build and start sending emails. To become an
Email Marketing Pro check out the
Email Marketing for TpT sellers course! You’ll learn everything from creating a landing page to writing email sequences. This is the perfect course to get you started on email marketing.